


Building a production OpenShift platform on physical servers is easier when the work is divided into clear phases: plan the infrastructure, discover the hosts, install the cluster, add virtualization and storage, configure VM networking, and then migrate workloads.
This guide walks through that complete path in plain language. It uses the OpenShift Assisted Installer for the base cluster, OpenShift Virtualization for virtual machines, an enterprise CSI storage platform for persistent storage, Kubernetes NMState for host networking, and the Migration Toolkit for Virtualization for moving existing VMs.
The examples use documentation-only names and addresses. Replace them with values approved by your DNS, networking, storage, security, and platform teams.
Before you begin: the platform in plain English
If you are new to OpenShift, think of the platform as a managed group of Linux servers:
- OpenShift is Red Hat’s Kubernetes platform. Kubernetes decides where applications run and keeps them running.
- Bare metal means OpenShift is installed directly on physical servers rather than on virtual machines supplied by a cloud provider.
- Control-plane nodes make decisions for the cluster. They store cluster state, schedule work and expose the Kubernetes API.
- Worker nodes run application containers and, after virtualization is enabled, virtual machines.
- An Operator is software that installs and manages another product inside OpenShift.
- A StorageClass is a storage profile. Applications request storage through a PersistentVolumeClaim (PVC) instead of choosing a disk directly.
- NMState describes host networking as Kubernetes resources, so bridges, bonds and VLANs can be managed consistently.
- The Migration Toolkit for Virtualization helps move existing virtual machines into OpenShift Virtualization.
You do not need to complete the whole platform in one maintenance window. The safest approach is to finish and test one layer before adding the next.

What you will build
By the end of the guide, the environment will contain:
- A highly available OpenShift cluster installed on bare-metal servers.
- Three control-plane nodes and at least three worker nodes for a typical production topology.
- A downloaded and securely stored
kubeconfigfor cluster administration. - OpenShift Virtualization for running virtual machines alongside containers.
- A CSI-compatible enterprise storage layer with a default StorageClass.
- A managed internal image registry backed by persistent storage.
- Linux bridge networking created with Kubernetes NMState.
- Migration providers, mappings, and plans for importing existing VMs.
How the pieces fit together
The Assisted Installer builds the OpenShift cluster first. OpenShift Virtualization then adds the ability to run VMs. The CSI storage platform supplies persistent disks for containers and VMs. NMState supplies the network bridges that connect VMs to the required networks. Finally, the Migration Toolkit copies workloads from the existing virtualization platform into the new environment.
Keep that dependency order in mind: a migration cannot succeed if the destination cluster, storage or networking is not already healthy.
1. Complete the design before opening the installer
The Assisted Installer simplifies deployment, but it cannot compensate for missing DNS, unstable time synchronization, or an incomplete network design.
Why this matters: the installer can configure OpenShift, but it cannot invent IP addresses, DNS records, VLANs or firewall rules. Treat the table below as a conversation checklist for the platform, network, storage and security teams.
Prepare and approve these inputs first:
| Area | Minimum decision |
|---|---|
| Cluster identity | Cluster name, base domain, OpenShift release and CPU architecture |
| Nodes | Control-plane and worker count, CPU, RAM, installation disk and firmware mode |
| DNS | api, api-int and wildcard *.apps records |
| Load balancing | TCP 6443, 22623, 80 and 443 paths |
| Networking | Machine, cluster and service networks; gateways; DNS; NTP; VLANs; MTU |
| Storage | Boot disks, data disks, SAN paths, StorageClasses and capacity policy |
| Security | Pull secret handling, SSH access, certificate plan and identity provider |
| Operations | Monitoring, logging, backup, upgrade and rollback ownership |
For a production cluster, verify that every node meets the hardware requirements for the selected release and installed Operators. Virtualization and software-defined storage add meaningful CPU, memory, disk, and network requirements.
Version note: Select a currently supported OpenShift release and confirm compatibility with the virtualization, storage, backup, and migration products before installation. Do not assume that a manifest copied from an older environment is valid for a newer release.
Beginner checkpoint: before continuing, you should be able to draw the nodes, their IP addresses, the API and application addresses, and the storage and VM networks on one page.
2. Create a dedicated SSH key
Generate the key on a secured administration host. Do not reuse a personal key or embed a private key in installation documents.
An SSH key has two parts. The public key is safe to place in the installer. The private key proves your identity and must remain only on the secured administration host.
install -d -m 0700 ~/.ssh
ssh-keygen -t ed25519 -N '' -f ~/.ssh/id_ed25519
cat ~/.ssh/id_ed25519.pub
Copy only the public key into the installer. Protect the private key with operating-system permissions and your organization’s privileged-access controls.
The first command creates the SSH directory with restrictive permissions. The second creates a modern Ed25519 key pair without overwriting the operating system. The final command prints the public half so it can be pasted into Assisted Installer.
3. Create the cluster in Assisted Installer
Sign in to the Red Hat Hybrid Cloud Console, open OpenShift → Create Cluster, and choose the on-premises Assisted Installer workflow.
Assisted Installer is a guided web interface. It collects your design choices, creates a bootable discovery image, validates the servers and then performs the cluster installation.
Enter the cluster name, base domain, version and architecture. For a conventional highly available deployment, select three control-plane nodes and the required number of workers. Add the pull secret and SSH public key only through the secured installer interface.

Important choices made here become difficult or impossible to change after installation starts:
- Base domain and cluster name.
- IPv4, IPv6 or dual-stack design.
- Machine, service and cluster network ranges.
- Control-plane topology.
- Disk encryption and installation disks.
- Platform integration and optional Operator bundles.
Generate the discovery ISO after the configuration is complete. Use the full ISO for simple deployments or the minimal ISO when hosts can download the root filesystem from the configured source.

Beginner checkpoint: do not boot any production server until another engineer has reviewed the cluster name, base domain, network ranges, host count and installation disks.
4. Boot and discover the physical hosts
Attach the discovery image through the server’s remote-management console, virtual media, PXE environment or approved boot method. Boot every intended node from the image.
The discovery image does not immediately install OpenShift. It starts a temporary environment that reports the server’s hardware and networking to Assisted Installer. This gives you an opportunity to review the hosts before their disks are changed.

The hosts register with the Assisted Installer and begin validation. Assign each host its intended role and select the correct installation disk. Never identify disks only by Linux device names such as /dev/sda; verify serial numbers, World Wide Names and capacity because enumeration can change between boots.
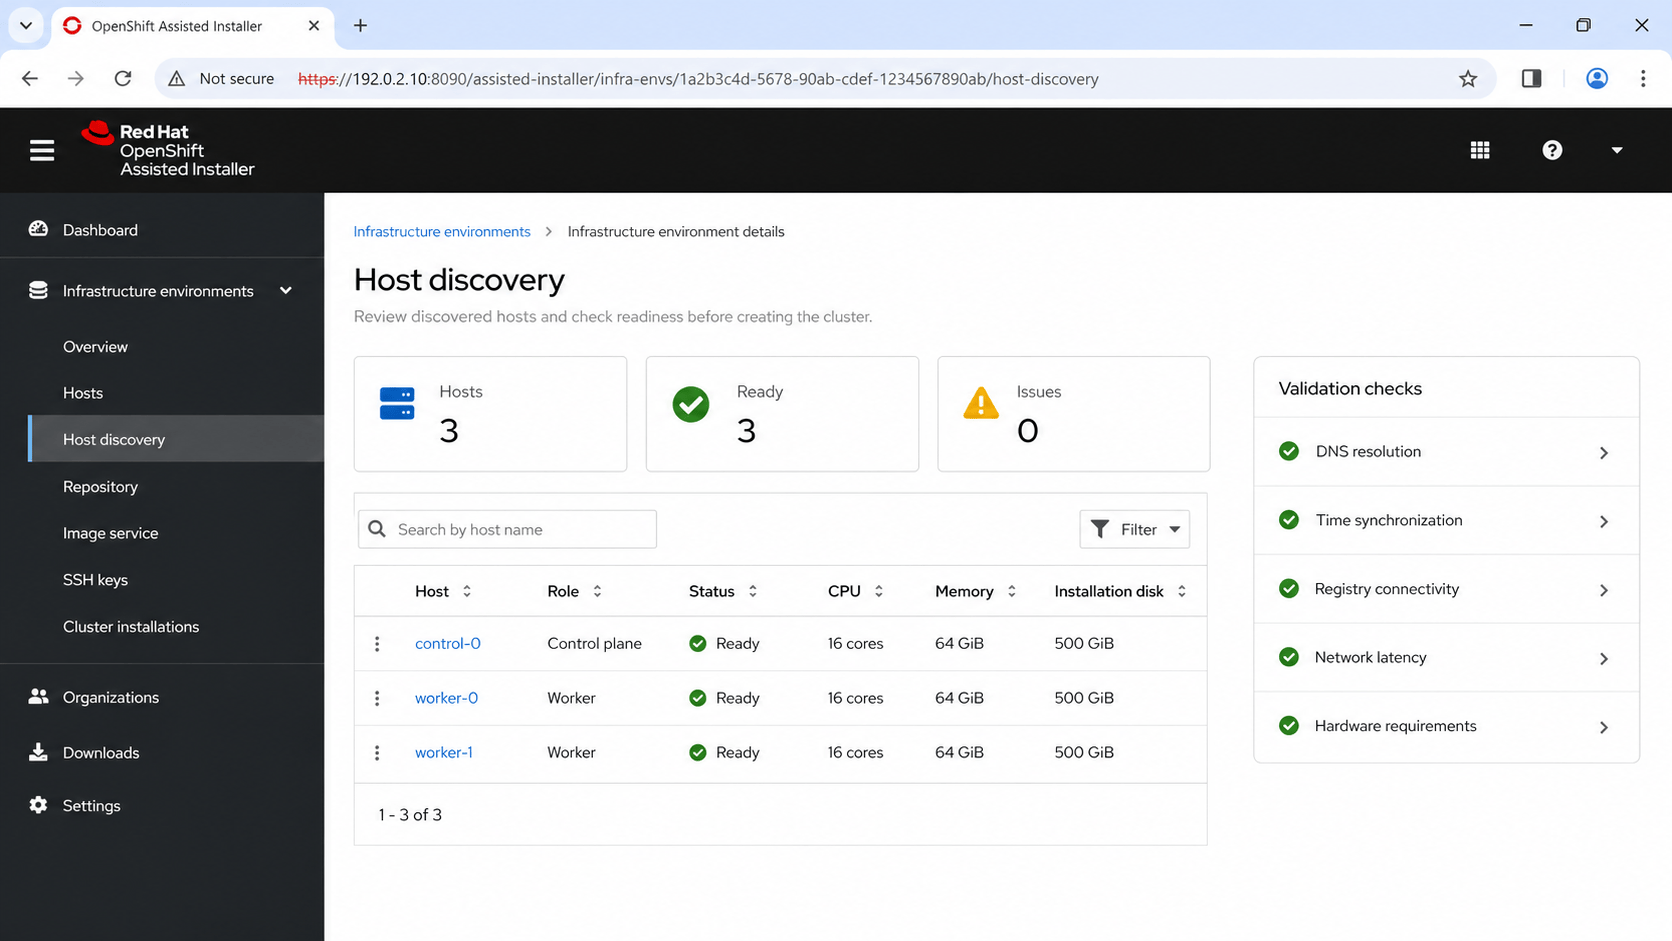
Do not proceed until the required validations are green:
- Hardware capacity and CPU architecture.
- DNS resolution for the cluster domain.
- NTP synchronization between nodes.
- Registry and internet or mirror-registry connectivity.
- Network latency and bandwidth.
- Installation disk eligibility.
- Required number of control-plane and worker hosts.
If a check fails, open its details and correct the underlying dependency. Rebooting repeatedly without resolving DNS, routing, MTU or time problems usually wastes time and hides the real fault.
You are finished with discovery when: every intended server appears once, its role is correct, its installation disk has been verified by serial number or WWN, and all blocking validations are green.
5. Review storage and networking
In Storage, confirm the installation disk on every host and make sure data disks intended for the storage platform are not selected as operating-system disks.
This is the last safety check before installation can overwrite disks. Separate the OpenShift operating-system disk from disks reserved for application storage.

In Networking, verify:
- Each node’s management address, prefix, gateway and DNS servers.
- The machine network contains the node addresses.
- The cluster and service networks do not overlap existing networks.
- API and application ingress addresses are reachable.
- VLAN and MTU values are consistent end to end.
- Proxy and mirror-registry settings are correct when used.

For static networking, use the installer’s NMState configuration and validate the generated host mapping carefully. A small MAC-address or interface-name mistake can leave a server undiscoverable after reboot.
If you are unsure about an address or VLAN, stop and verify it. Guessing at this stage can make the API unavailable or disconnect nodes after installation.
6. Start the installation and preserve the credentials
Select Review and Create, read every warning, and start the installation only after all mandatory checks pass.
During installation, the service bootstraps the control plane, installs the remaining nodes and brings the cluster Operators online. Download the kubeconfig and temporary administrator password when they become available. Store them in an approved secret manager rather than a shared folder, ticket, screenshot or chat message.
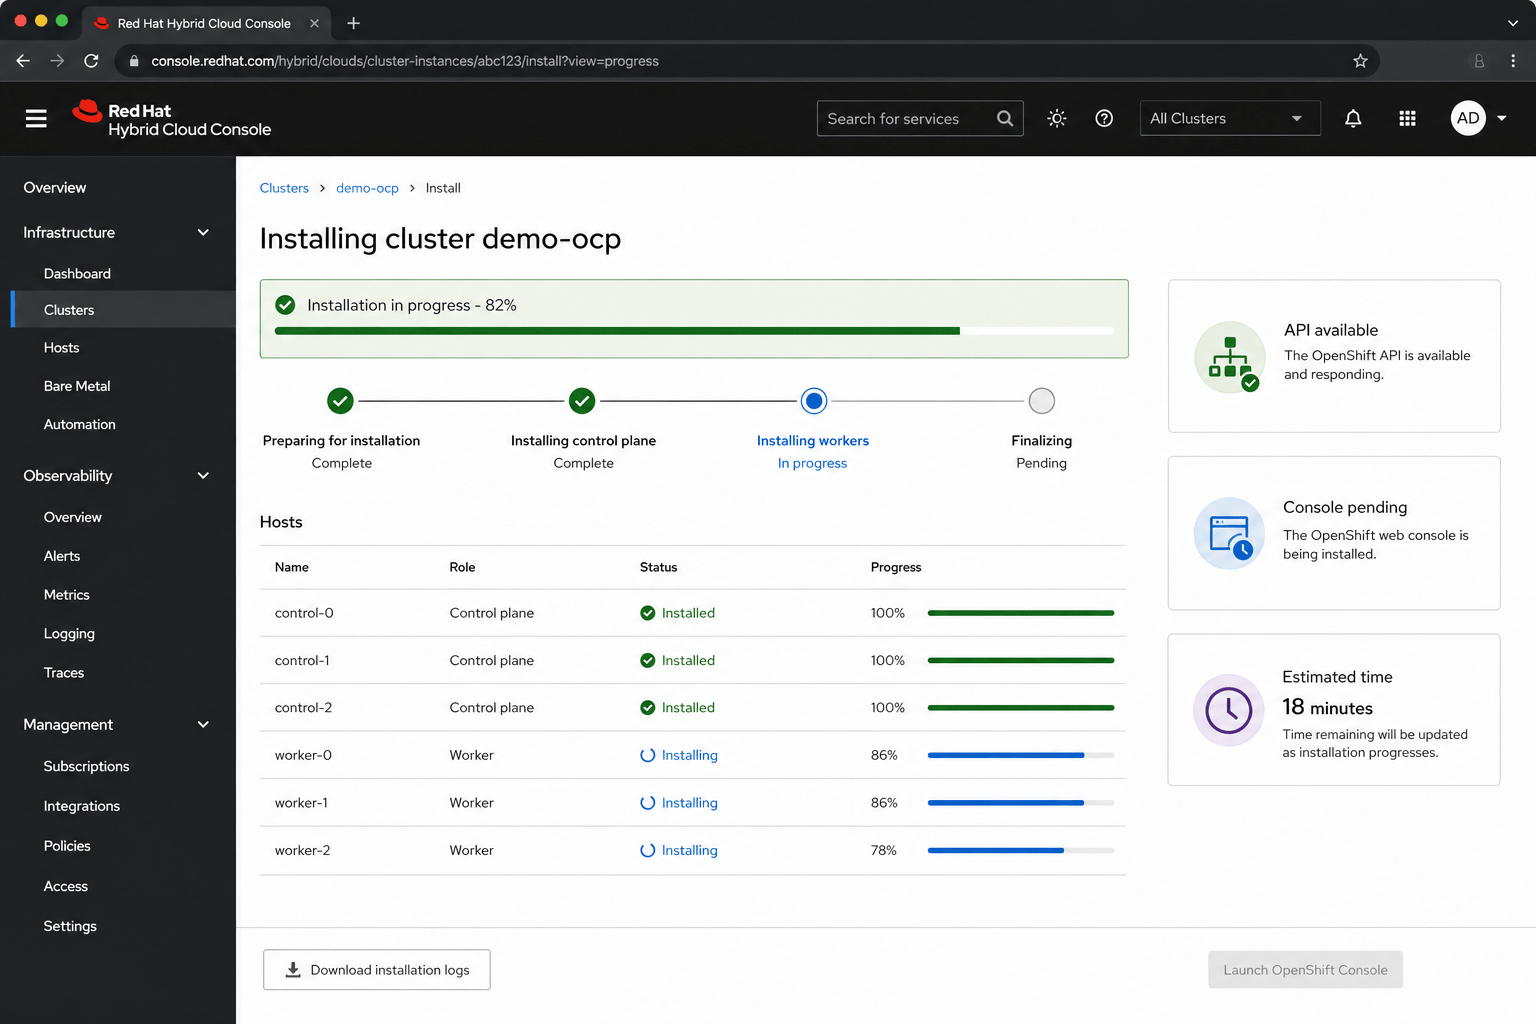
On the administration host:
install -d -m 0700 ~/cluster-auth
install -m 0600 /secure-download/kubeconfig ~/cluster-auth/kubeconfig
export KUBECONFIG=~/cluster-auth/kubeconfig

oc whoami
oc get nodes -o wide
oc get clusterversion
oc get clusteroperators
oc get machineconfigpools
What these checks tell you:
oc whoamiconfirms that the kubeconfig authenticates successfully.oc get nodes -o wideshows every node, its role, status and IP address.oc get clusterversionshows the installed OpenShift version and update state.oc get clusteroperatorsreports the health of core platform services.oc get machineconfigpoolsconfirms that node-level configuration has finished rolling out.
The cluster is ready for post-installation work when the expected nodes are Ready, the ClusterVersion reports the desired release, MachineConfigPools are updated, and ClusterOperators do not show unresolved degradation.

Configure an enterprise identity provider and administrative groups as early as possible. After verifying alternative administrative access, remove the temporary bootstrap administrator according to Red Hat guidance.
Do not continue to optional platform components while core ClusterOperators are degraded. Fix the base cluster first; otherwise later failures become much harder to diagnose.
7. Install OpenShift Virtualization
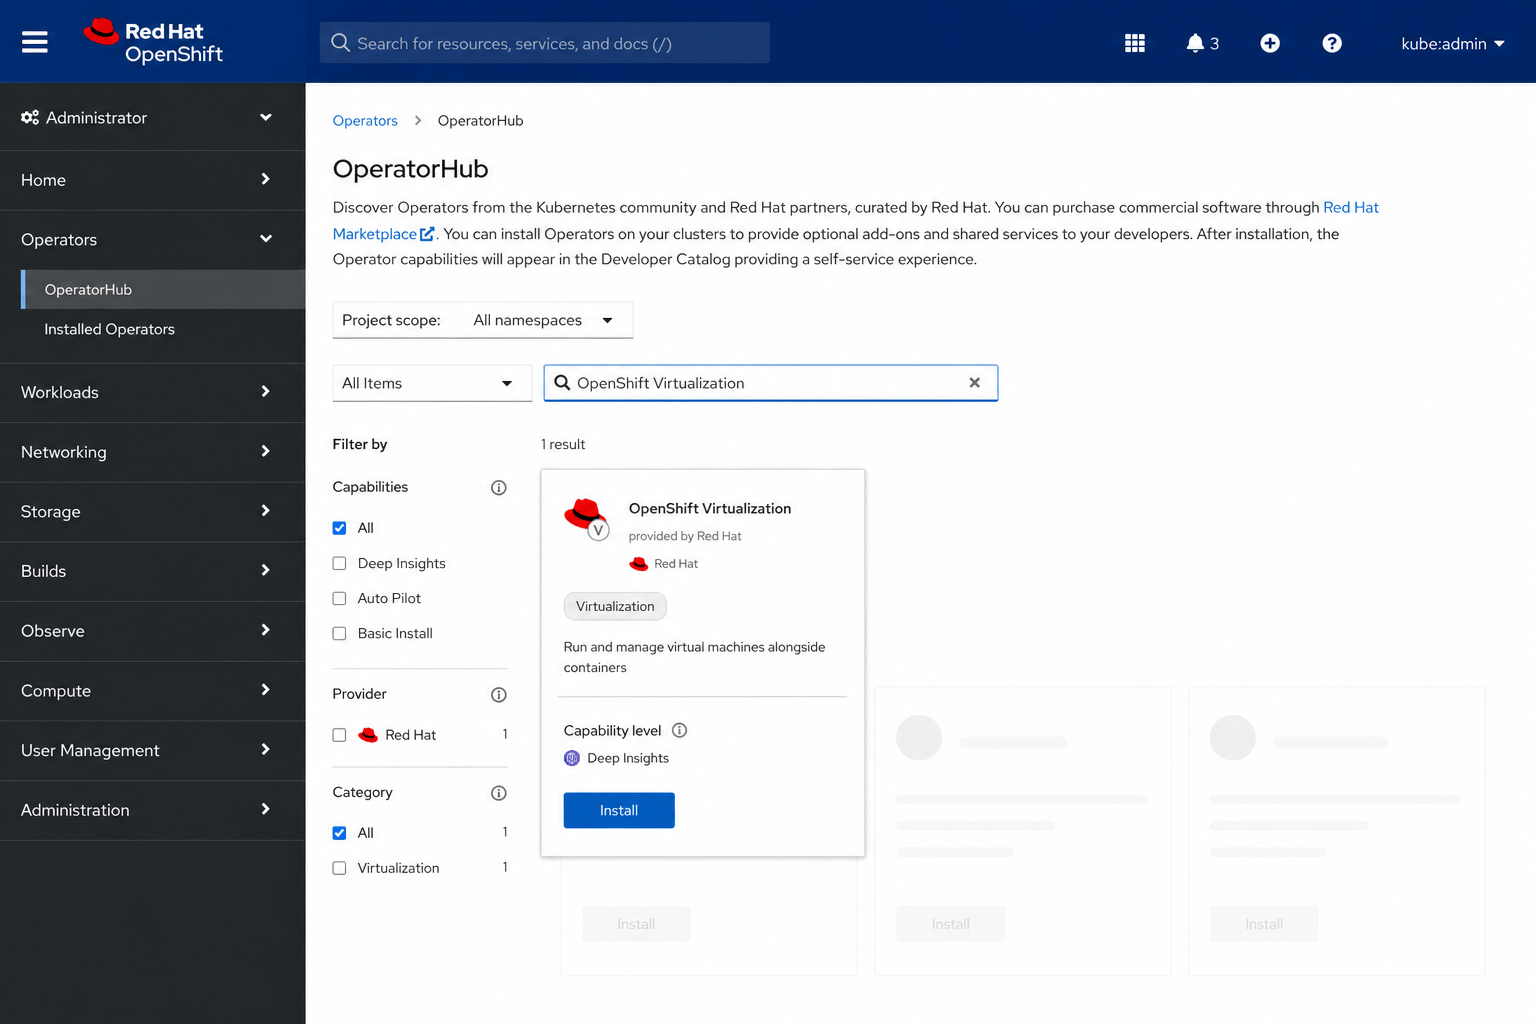
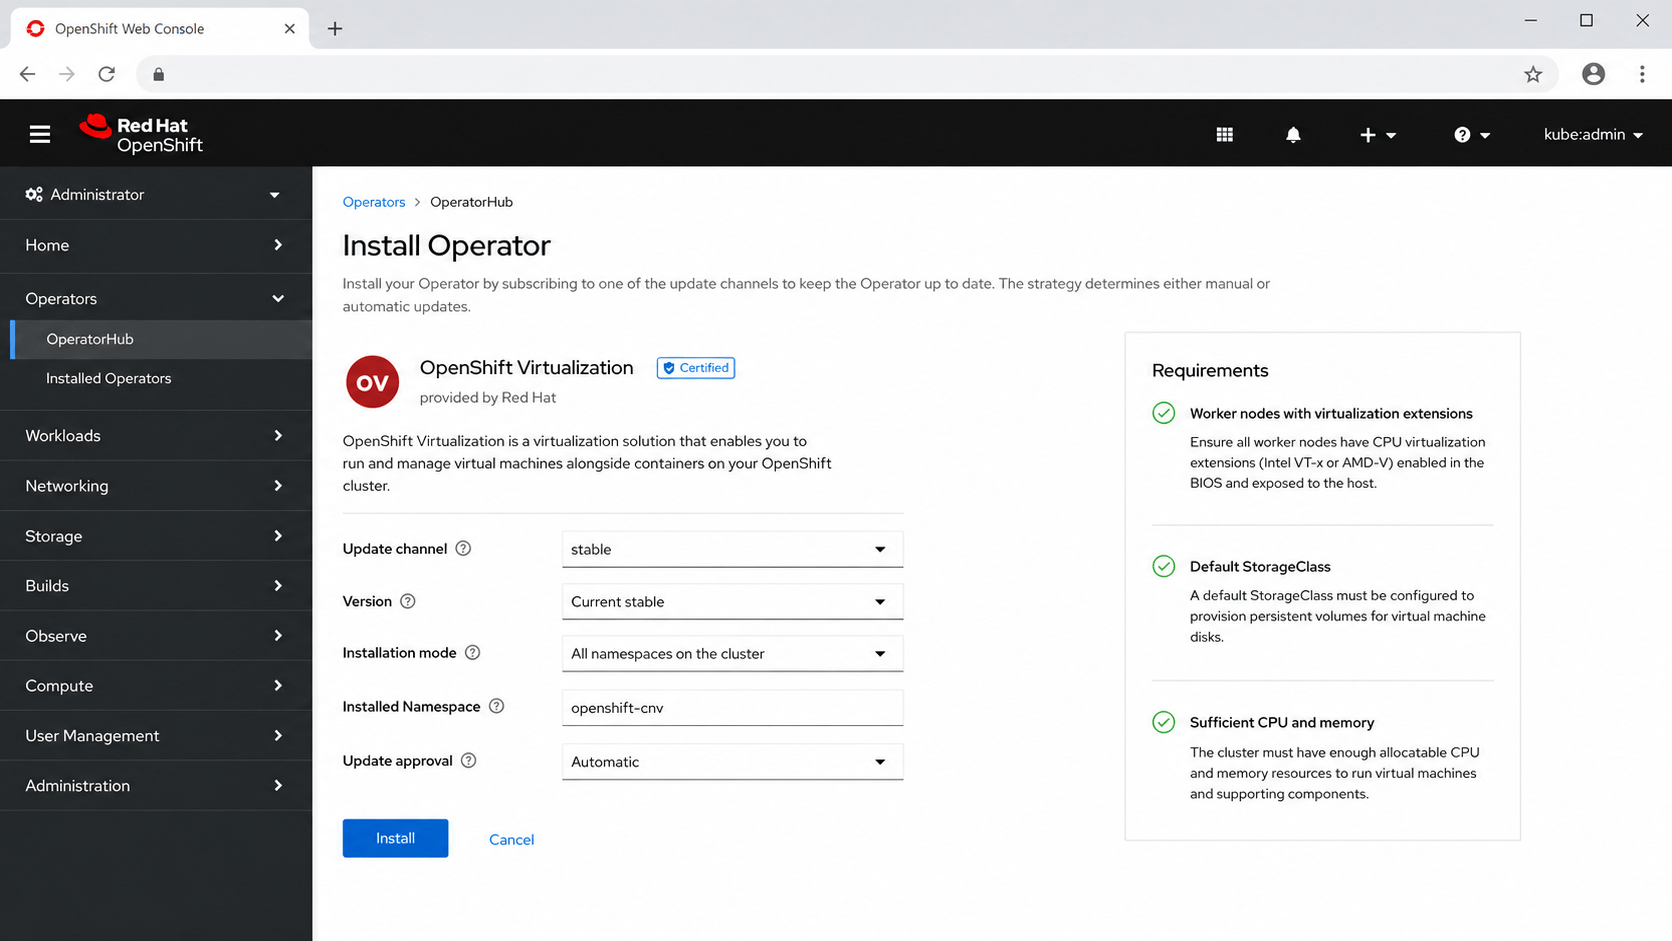
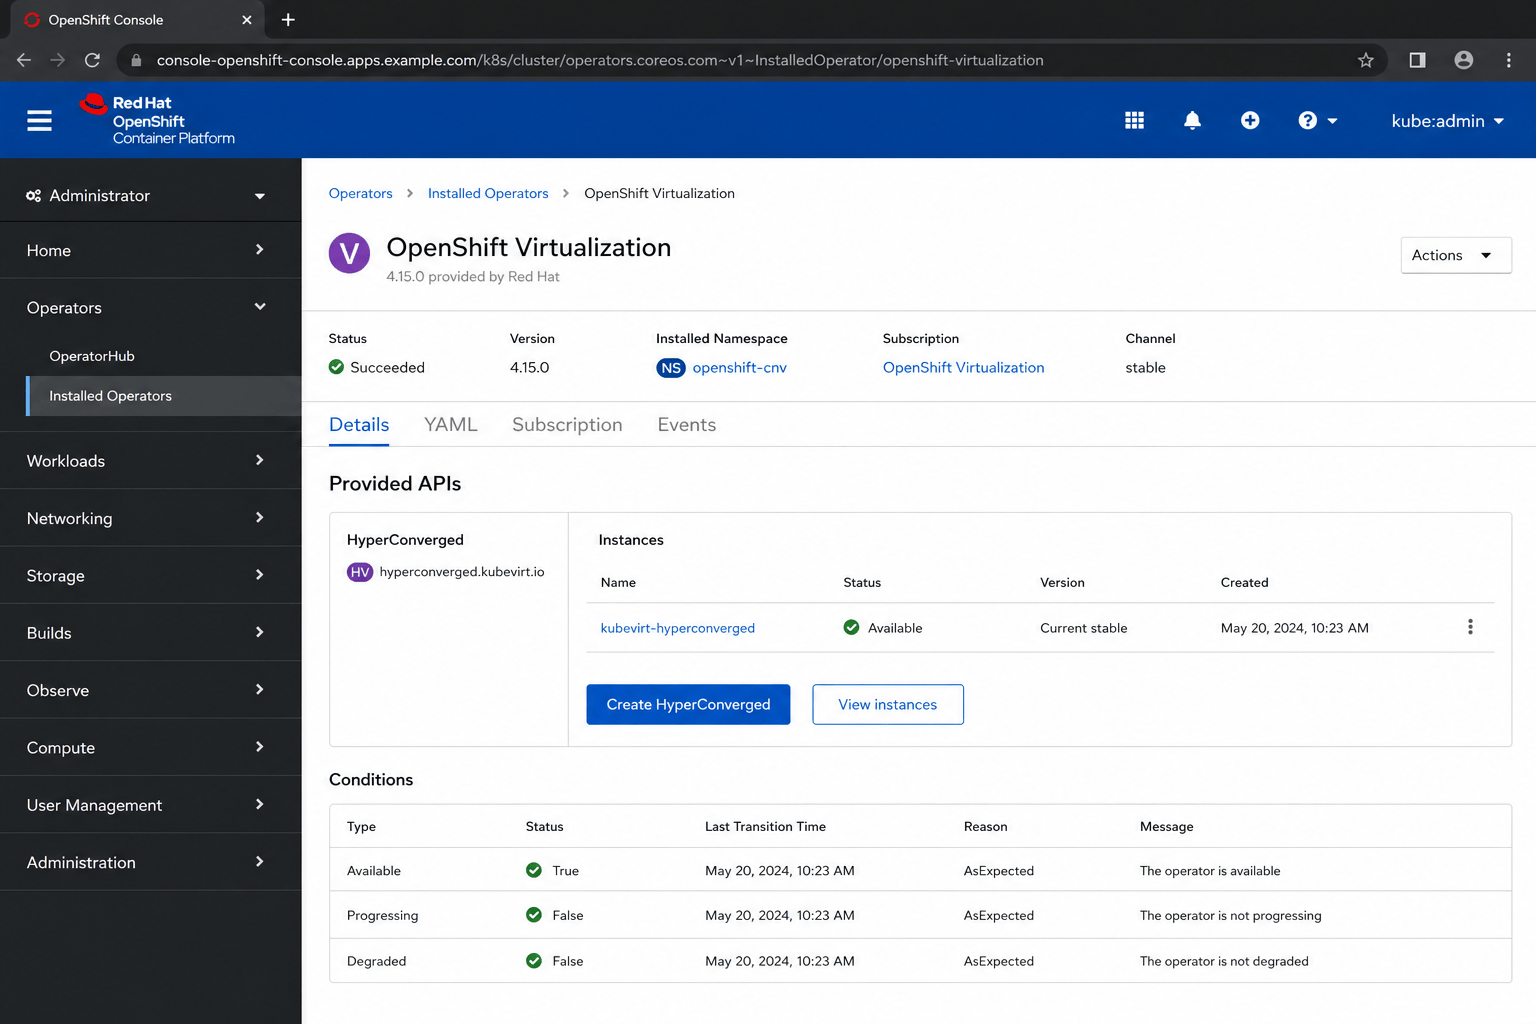
Open Operators → OperatorHub, search for OpenShift Virtualization, select the supported stable channel, and install it in the recommended namespace. Then create the HyperConverged custom resource from the installed Operator.
OpenShift Virtualization adds KubeVirt to the cluster. It lets Kubernetes create and manage VMs using familiar OpenShift projects, permissions, networks and storage.
Verify the deployment:
oc get csv -n openshift-cnv
oc get hyperconverged -n openshift-cnv
oc get pods -n openshift-cnv
oc get storageclass
All required virtualization pods should become ready. Worker nodes intended to run VMs must expose hardware virtualization extensions, and the cluster needs an appropriate default StorageClass for VM disks.
The CSV is the Operator installation record. The HyperConverged resource activates the virtualization components. If either is unhealthy, inspect the Operator conditions and pod events before creating a VM.
8. Plan multipath storage correctly
Multipath must be treated as a node operating-system design decision, not a command pasted onto one temporary shell session. Red Hat recommends enabling multipathing during installation when the operating system or data devices require multiple SAN paths.
Multipath allows one storage device to be reached through more than one physical path. If a cable, switch port or storage controller path fails, traffic can continue over another path. It is useful only when the SAN and server are designed for it.
For an installation environment, the preparation commonly begins with:
mpathconf --enable
systemctl start multipathd.service
The persistent RHCOS configuration depends on whether multipath is required for the root disk, data disks, or both. Follow the documented coreos-installer kernel arguments or MachineConfig procedure for the selected OpenShift release and storage topology.
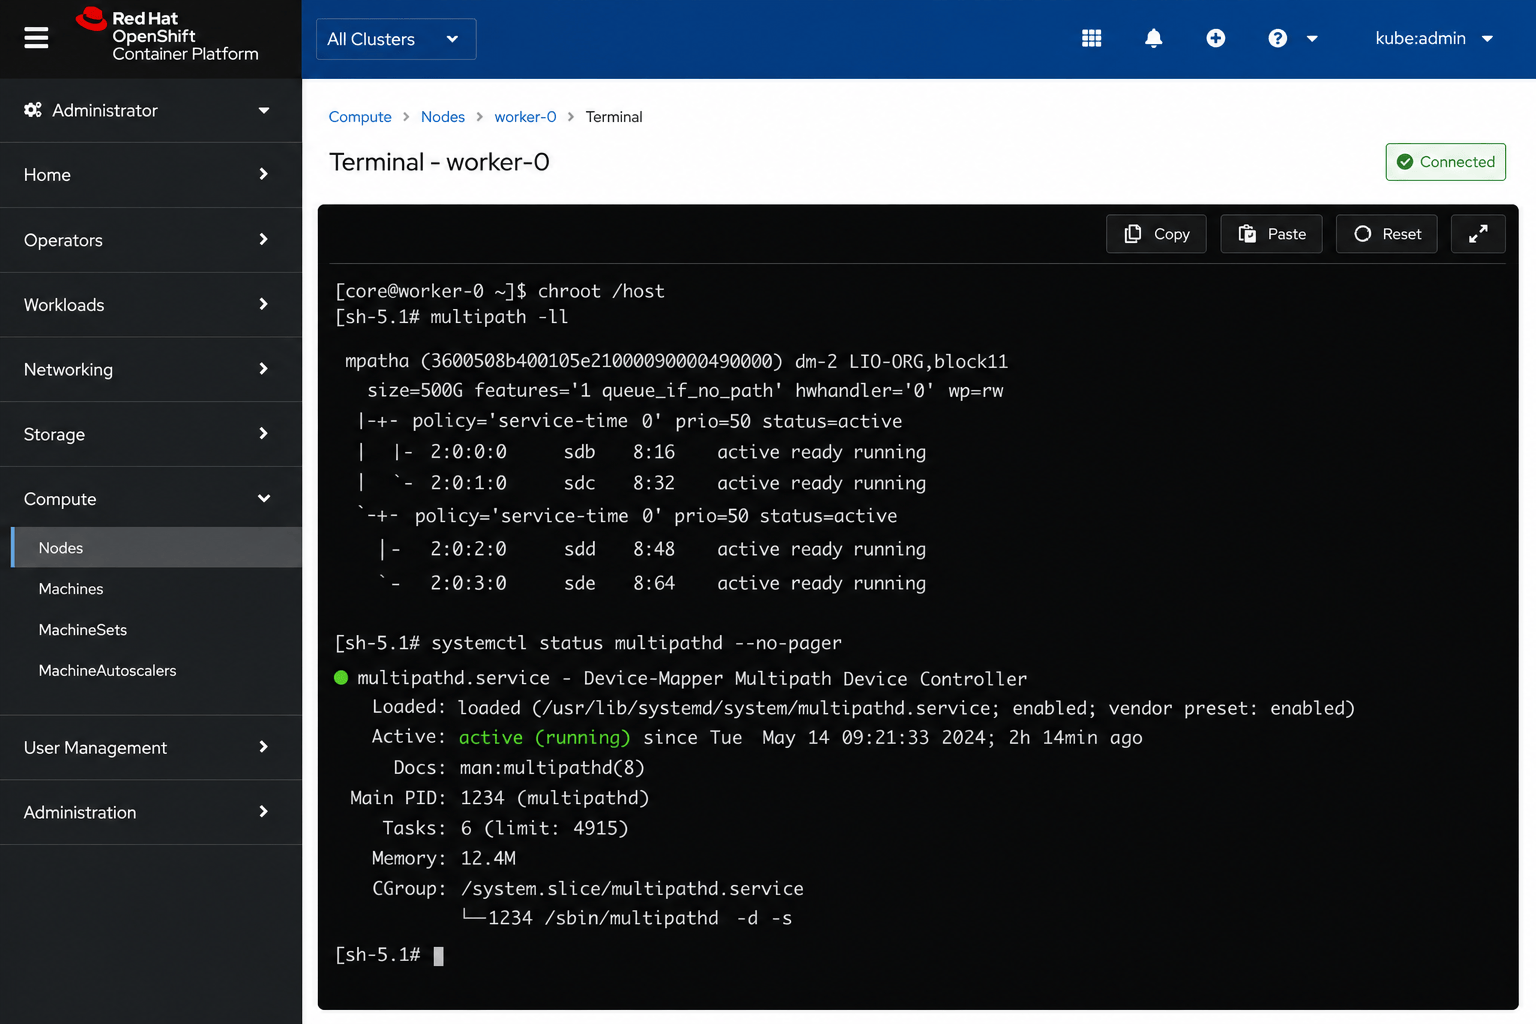
Before placing workloads on the storage, verify paths on every applicable node:
oc debug node/worker-0
chroot /host
multipath -ll
systemctl status multipathd --no-pager
exit
Do not manually change RHCOS files and expect the changes to survive. Manage persistent node configuration through supported installation parameters, MachineConfig resources or the storage vendor’s Operator.
In the debug example, chroot /host moves the shell from the temporary debug container into the node’s operating-system filesystem. multipath -ll should show the expected device and all healthy paths.
9. Install the enterprise storage platform
First, check the vendor support matrix for the exact OpenShift, Kubernetes and storage-platform versions. Confirm disk eligibility, KVDB design, network interfaces, time synchronization, kernel compatibility and required firewall flows.
A CSI storage platform turns approved local disks or SAN devices into storage that applications can request through Kubernetes. It should be installed only after the base cluster and node storage paths are healthy.
Label storage and storageless nodes deliberately when the design requires it:
oc label node worker-0 portworx.io/node-type=storage
oc label node worker-1 portworx.io/node-type=storage
oc label node worker-2 portworx.io/node-type=storage
Enable user-workload monitoring if required by the supported installation procedure:
apiVersion: v1
kind: ConfigMap
metadata:
  name: cluster-monitoring-config
  namespace: openshift-monitoring
data:
  config.yaml: |
    enableUserWorkload: true
Generate the cluster specification in the vendor portal using Bare Metal, OpenShift 4+, and the correct DAS or SAN option. Review every generated field rather than accepting defaults blindly.
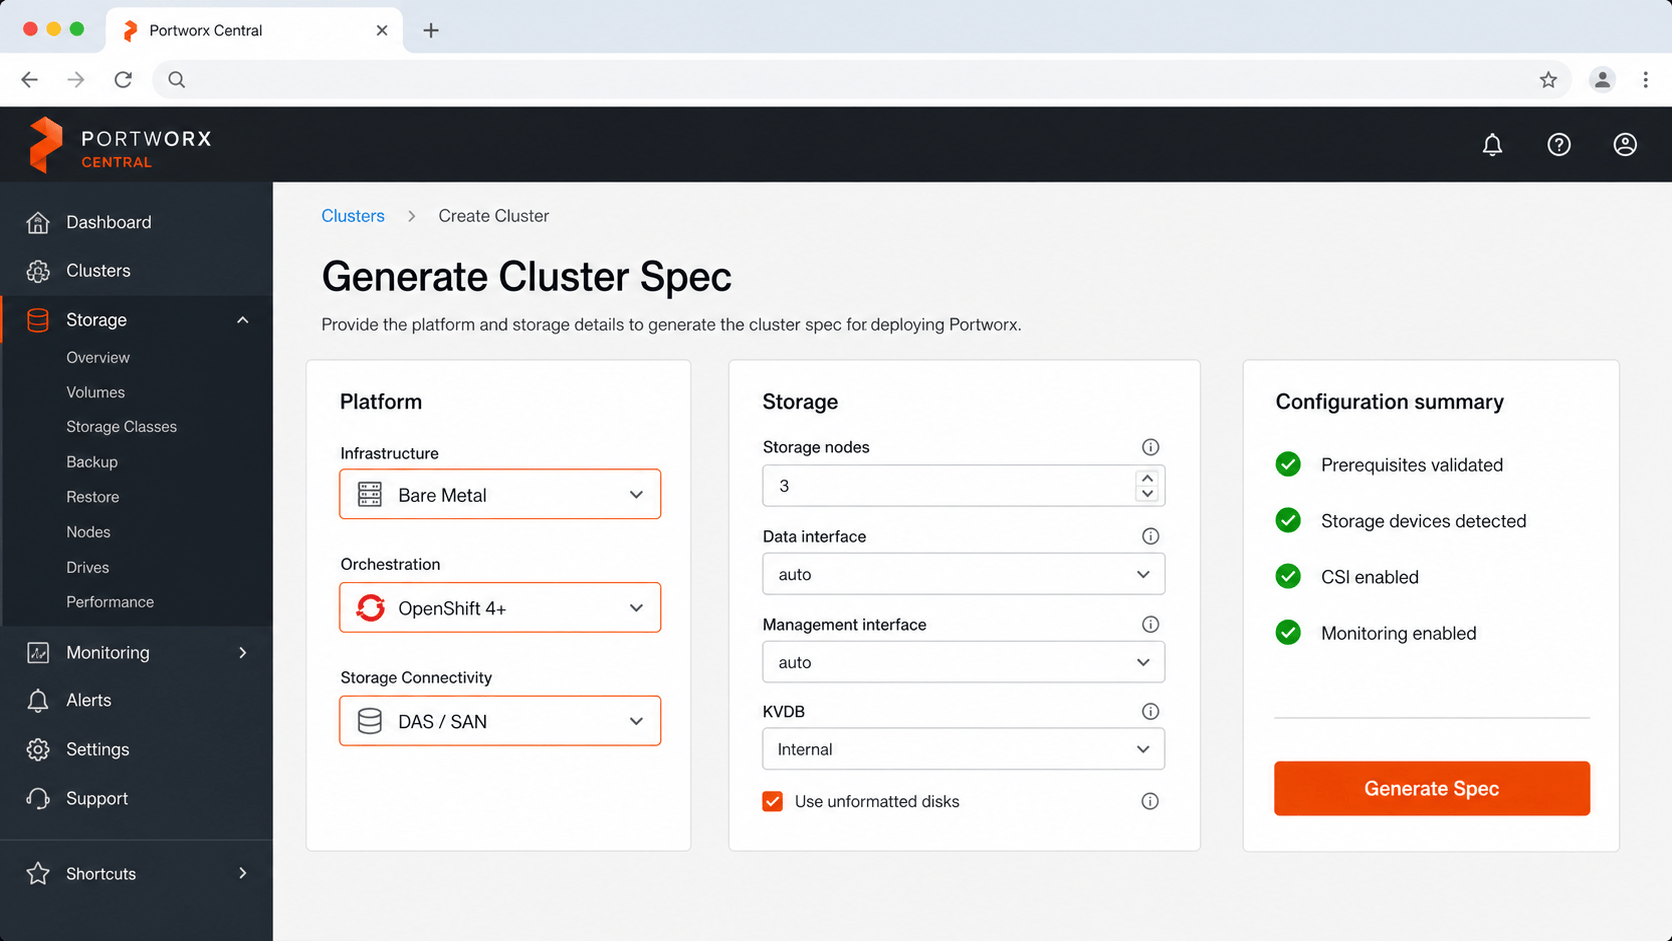

Install the supported Operator from OperatorHub, create its StorageCluster resource from the reviewed specification, and watch the rollout:
oc get storagecluster -n portworx
oc get pods -n portworx -o wide
oc get storageclass

PX_POD=$(oc -n portworx get pod -l name=portworx \
  -o jsonpath='{.items[0].metadata.name}')
oc -n portworx exec "$PX_POD" -c portworx -- \
  /opt/pwx/bin/pxctl status
The first three commands check the storage custom resource, its pods and the StorageClasses it created. The remaining commands find one storage pod and run the vendor status tool inside it. A healthy status is necessary, but a real PVC and workload test is still required.

Create a test PVC and pod before making the StorageClass a production default. Test volume attachment, node failure, rescheduling, snapshot, expansion and restore.
10. Give the internal image registry persistent storage
Create a PVC using a supported ReadWriteMany-capable StorageClass. Adjust the capacity and StorageClass to the approved design.
OpenShift’s internal registry stores container images built or pushed inside the cluster. Persistent storage prevents those images from disappearing when a registry pod is restarted or moved to another node. ReadWriteMany allows multiple registry replicas to use the same storage where the chosen backend supports it.
apiVersion: v1
kind: PersistentVolumeClaim
metadata:
  name: registry-storage-pvc
  namespace: openshift-image-registry
spec:
  accessModes:
    - ReadWriteMany
  resources:
    requests:
      storage: 200Gi
  storageClassName: enterprise-rwx
Apply the PVC and patch the registry configuration:
oc apply -f registry-storage-pvc.yaml

oc patch configs.imageregistry.operator.openshift.io cluster \
  --type=merge \
  --patch '{"spec":{"managementState":"Managed","replicas":2,"storage":{"pvc":{"claim":"registry-storage-pvc"}}}}'

oc get clusteroperator image-registry
oc get pods,pvc -n openshift-image-registry

Wait for the registry Operator to report Available=True and confirm the PVC is bound before pushing images.
The patch tells the image-registry Operator to manage the registry, run two replicas and use the named PVC. A Bound PVC means Kubernetes successfully matched the request to storage.

To expose the default route and push a test image:
oc patch configs.imageregistry.operator.openshift.io cluster \
  --type=merge --patch '{"spec":{"defaultRoute":true}}'

REGISTRY_HOST=$(oc get route default-route \
  -n openshift-image-registry -o jsonpath='{.spec.host}')

podman login -u "$(oc whoami)" -p "$(oc whoami -t)" "$REGISTRY_HOST"
podman tag localhost/sample-app:v1 "$REGISTRY_HOST/demo/sample-app:v1"
podman push "$REGISTRY_HOST/demo/sample-app:v1"

oc get imagestream -n demo

Avoid placing login commands containing tokens in shell history, automation logs or screenshots. Use short-lived credentials and a secure CI/CD credential store.
The final push is a practical end-to-end test: authentication, the registry route, TLS, project permissions and persistent storage must all work together.
11. Configure VM networking with Kubernetes NMState
Install the Kubernetes NMState Operator and create its NMState instance. Use a NodeNetworkConfigurationPolicy to create the required bond, VLAN or Linux bridge on selected nodes.
A Linux bridge behaves like a small software switch inside each worker. A VM connects to the bridge, and the bridge connects to a physical interface, bond or VLAN. NMState lets you describe that connection as YAML rather than configuring every server by hand.
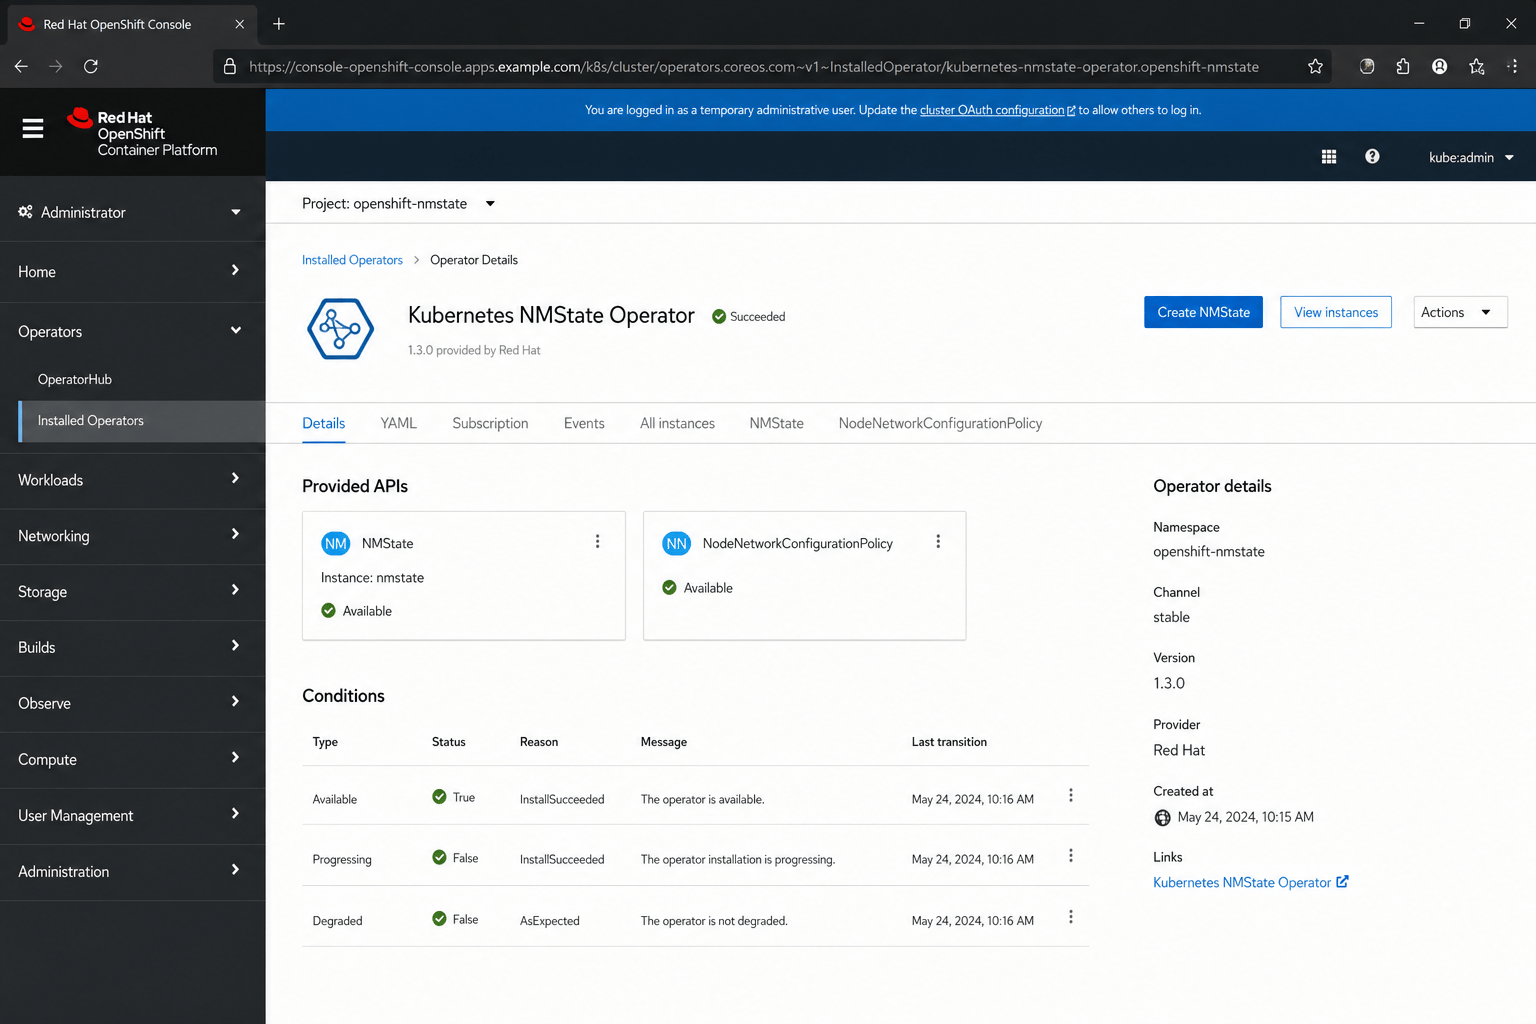
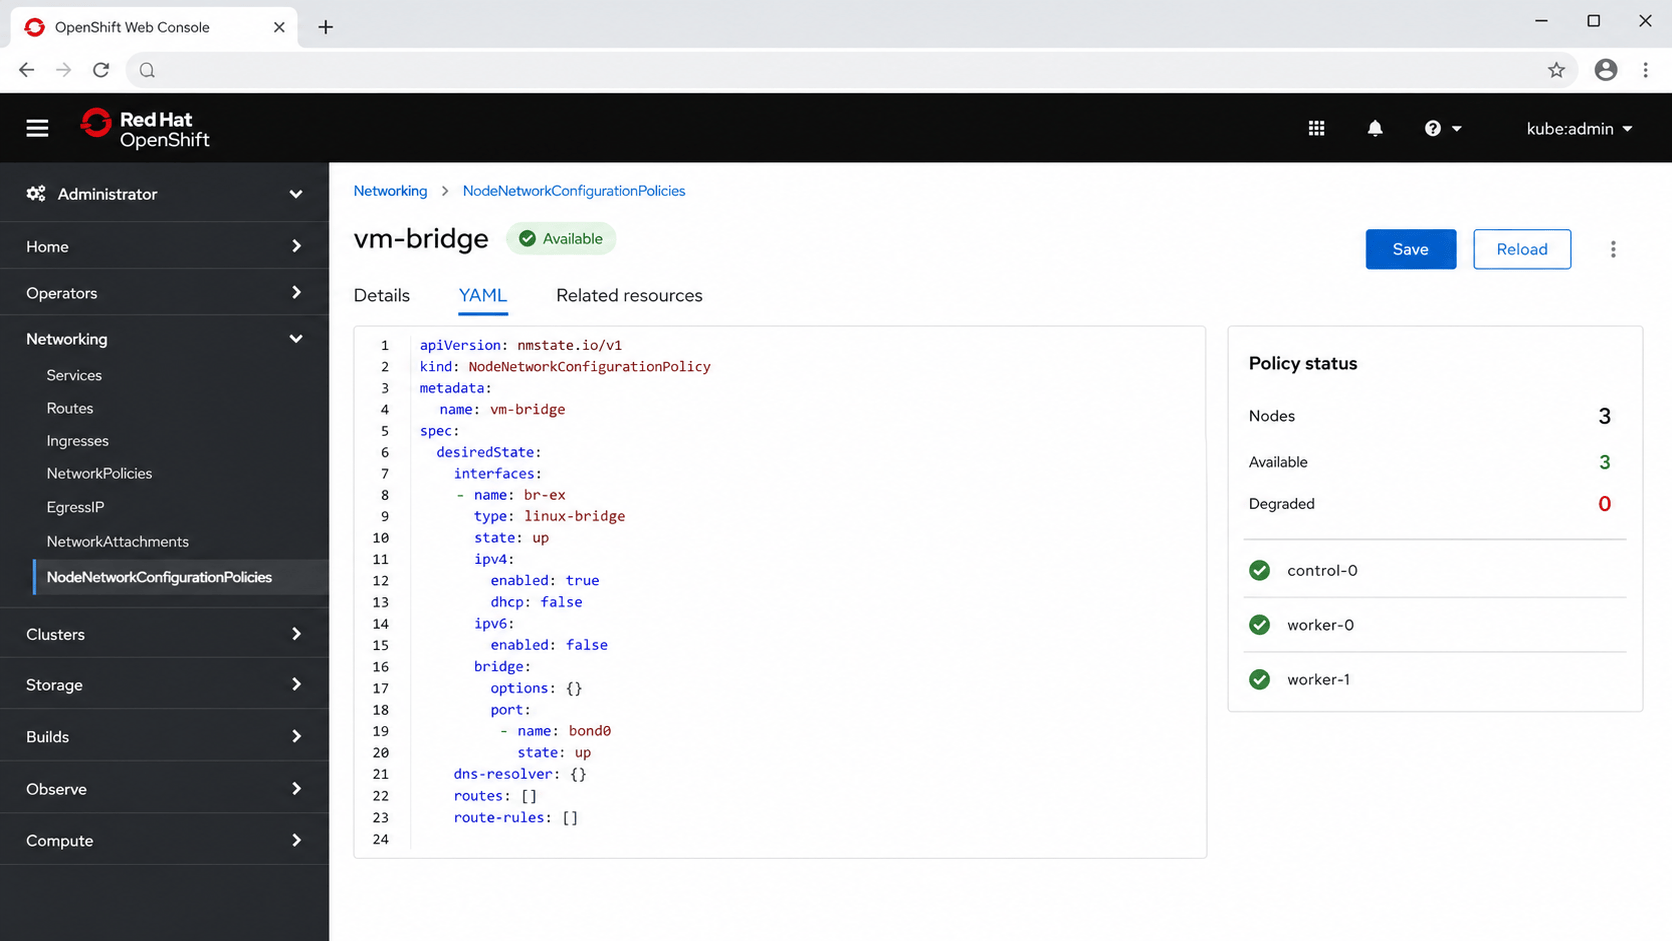
The following example creates a bridge on explicitly selected virtualization workers. Adapt the interface name and selector to the physical design.
apiVersion: nmstate.io/v1
kind: NodeNetworkConfigurationPolicy
metadata:
  name: vm-bridge
spec:
  nodeSelector:
    node-role.kubernetes.io/worker: ""
    feature.node.kubernetes.io/network-sriov.capable: "true"
  desiredState:
    interfaces:
      - name: br-ex
        type: linux-bridge
        state: up
        bridge:
          options:
            stp:
              enabled: false
          port:
            - name: bond0
Apply the policy to a limited test node group first:
oc apply -f vm-bridge-nncp.yaml
oc get nncp
oc get nnce
NNCP is the desired network policy. NNCE is the per-node result. Do not treat the policy as successful until the enactment reports that the required nodes are available and the management connection remains stable.
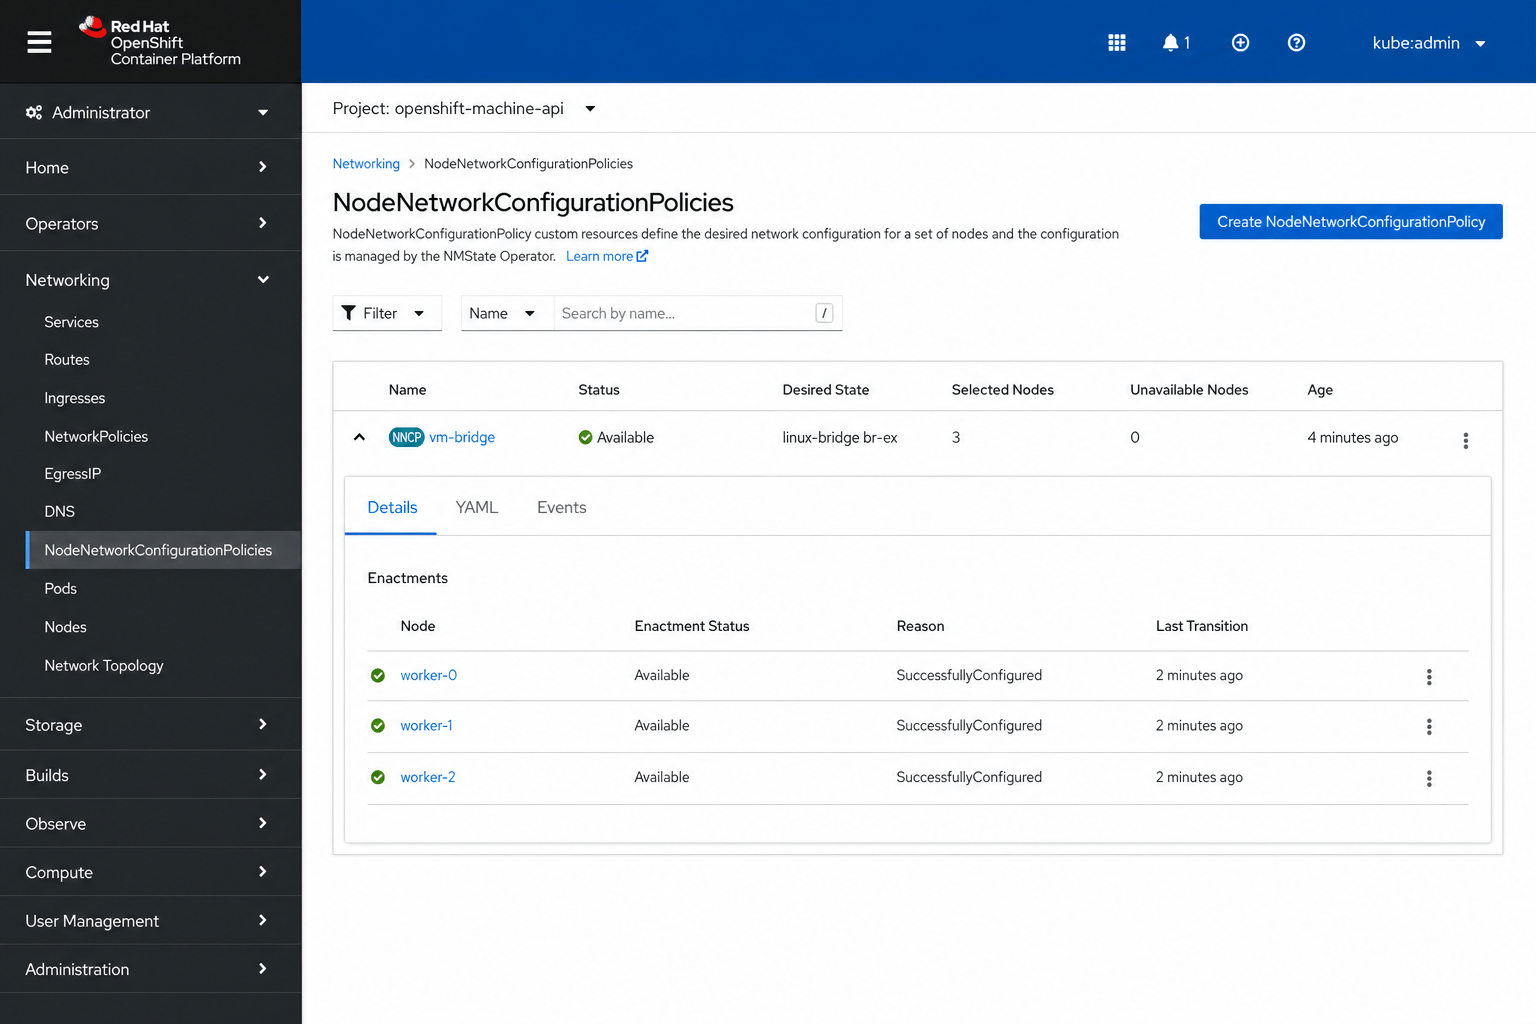
Do not roll an untested bridge policy across the entire cluster. A wrong physical port, VLAN, MTU or route can disconnect every affected node simultaneously.
After the policy is Available, create the appropriate NetworkAttachmentDefinition and attach it to a test VM. Confirm address assignment, gateway reachability, DNS, MTU and live-migration behavior.
12. Install and configure the Migration Toolkit for Virtualization
Install the Migration Toolkit for Virtualization Operator from OperatorHub. The Migration section appears after its components are ready.
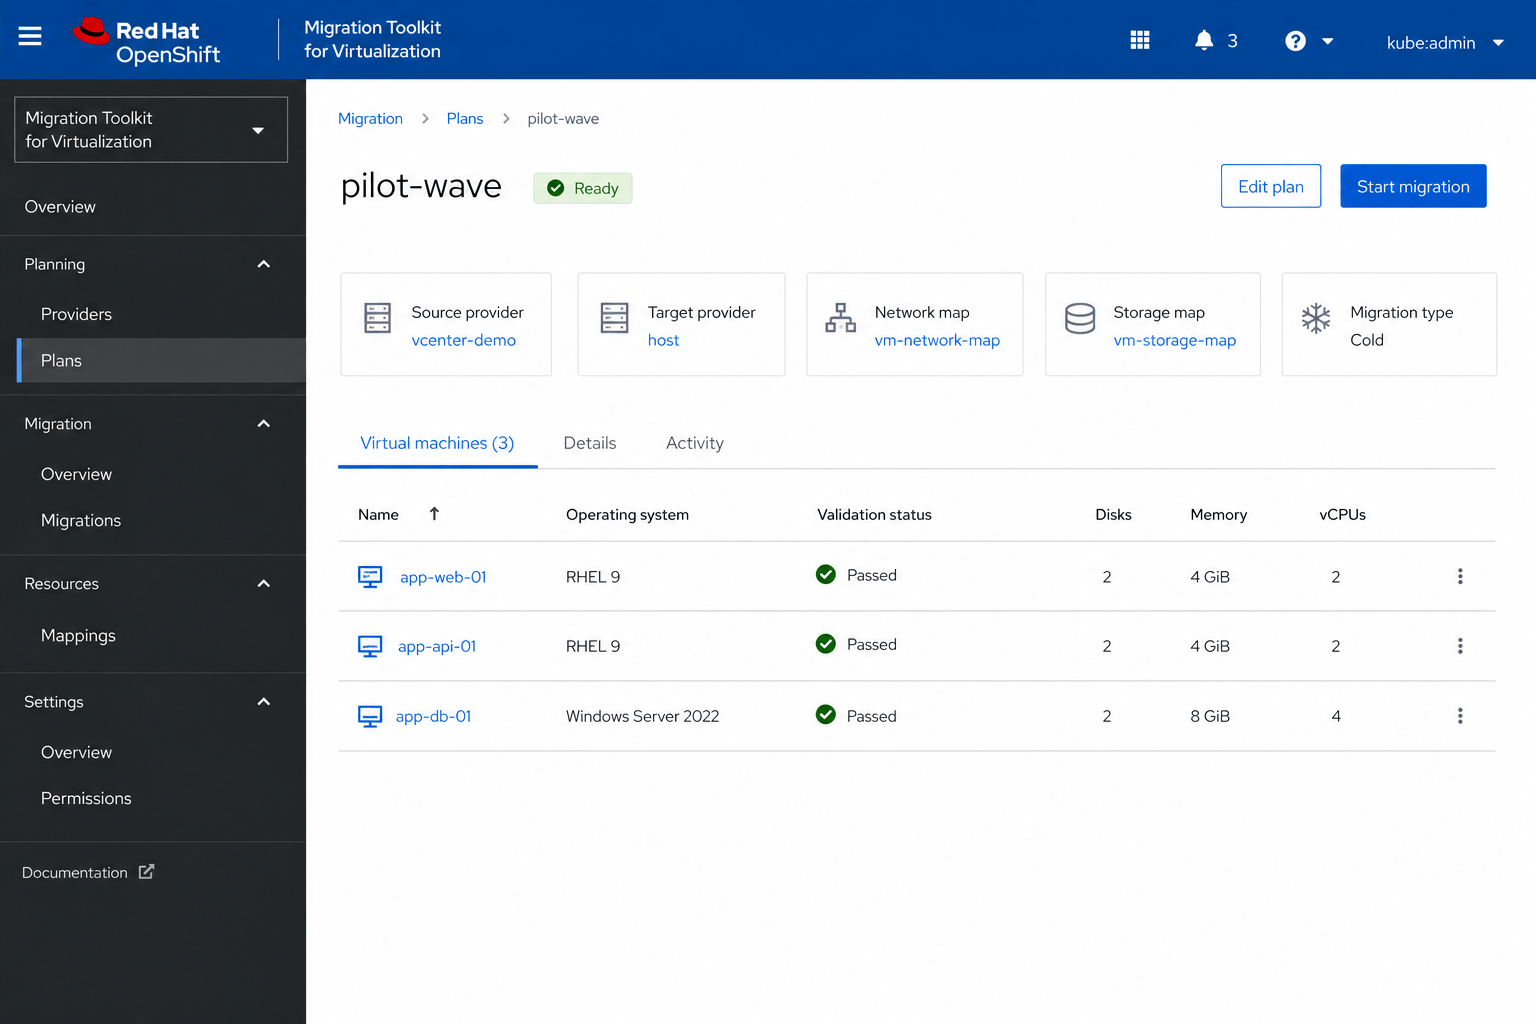
The toolkit coordinates the move; it does not remove the need for application testing. A provider is a connection to a source or destination platform. A mapping translates a source network or datastore into its OpenShift equivalent. A plan groups the VMs and migration settings for one controlled move.
Create the source provider and the destination OpenShift Virtualization provider. Provider credentials must come from a dedicated least-privilege account and an approved secret-management workflow.
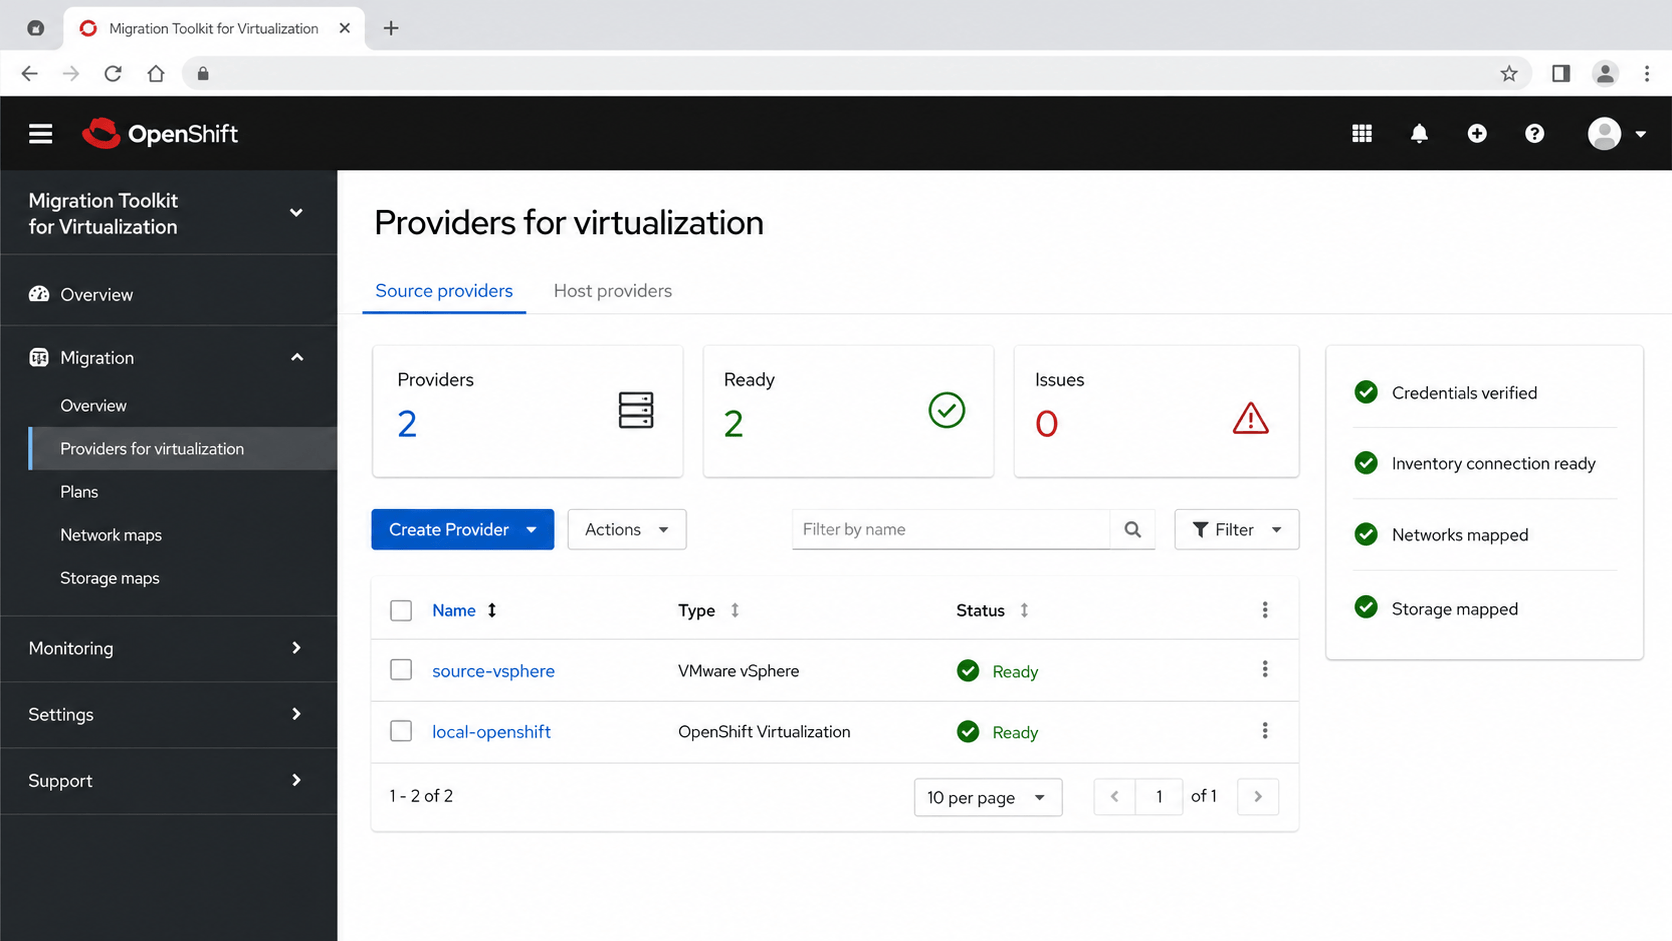
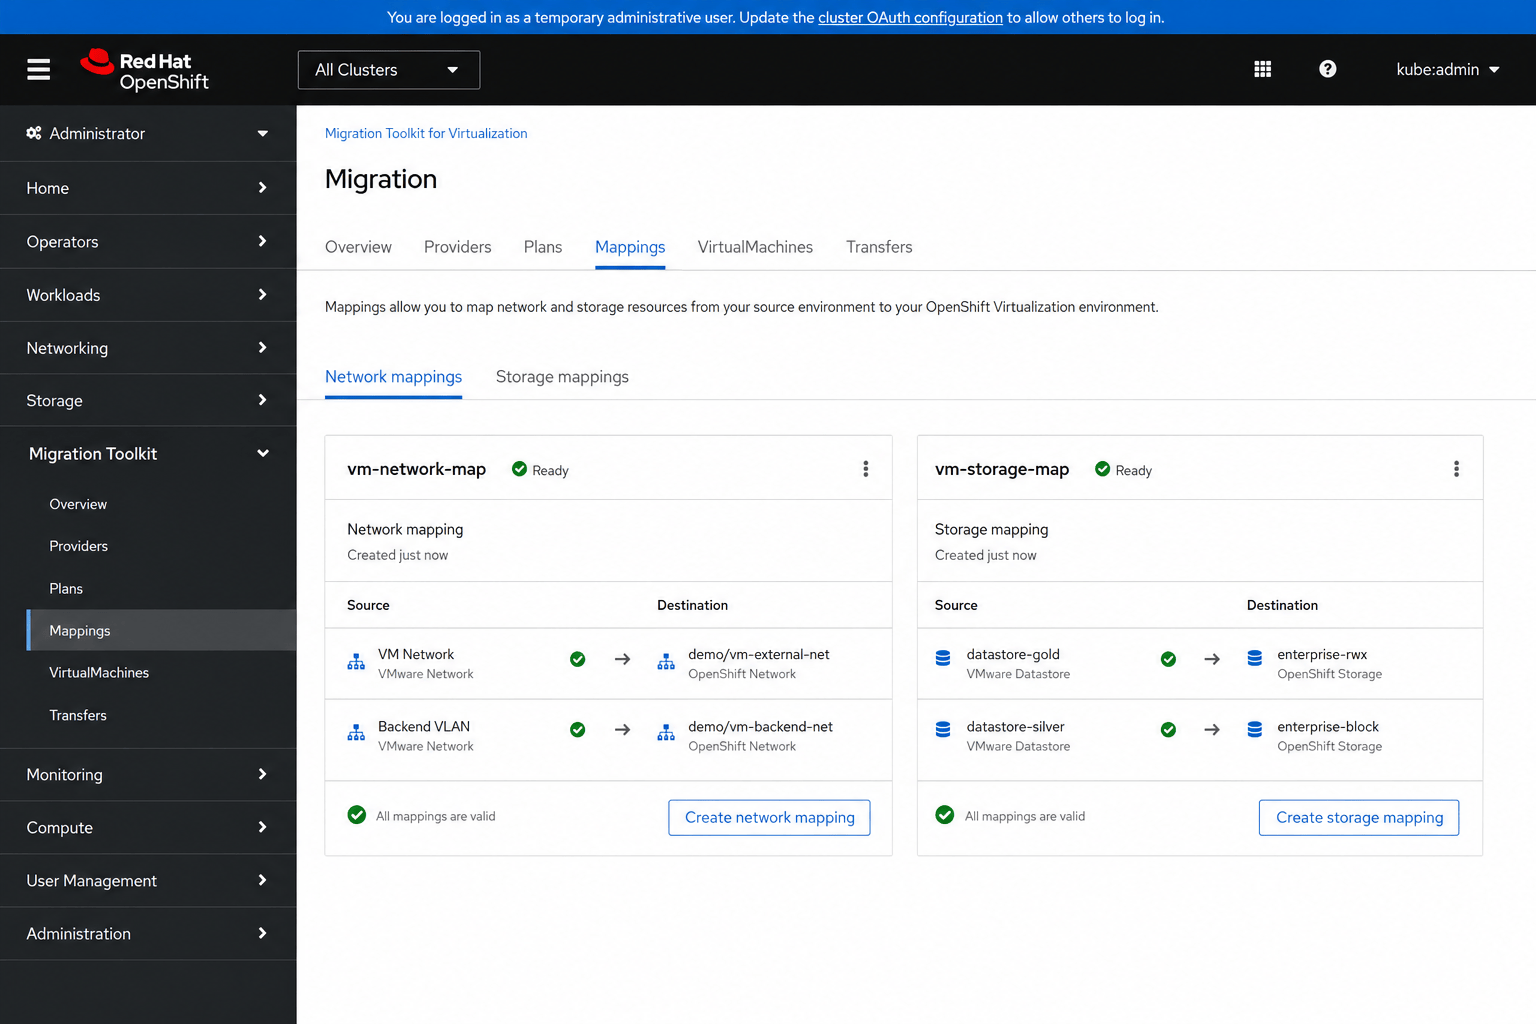
The migration workflow is:
- Create and validate the source and destination providers.
- Inventory the source virtual machines.
- Map source networks to destination NetworkAttachmentDefinitions.
- Map source datastores to destination StorageClasses.
- Create a migration plan for a small pilot group.
- Choose cold or warm migration based on downtime and platform support.
- Run validation and resolve every blocking issue.
- Execute the pilot, test the applications, and document rollback.
- Move production workloads in controlled waves.
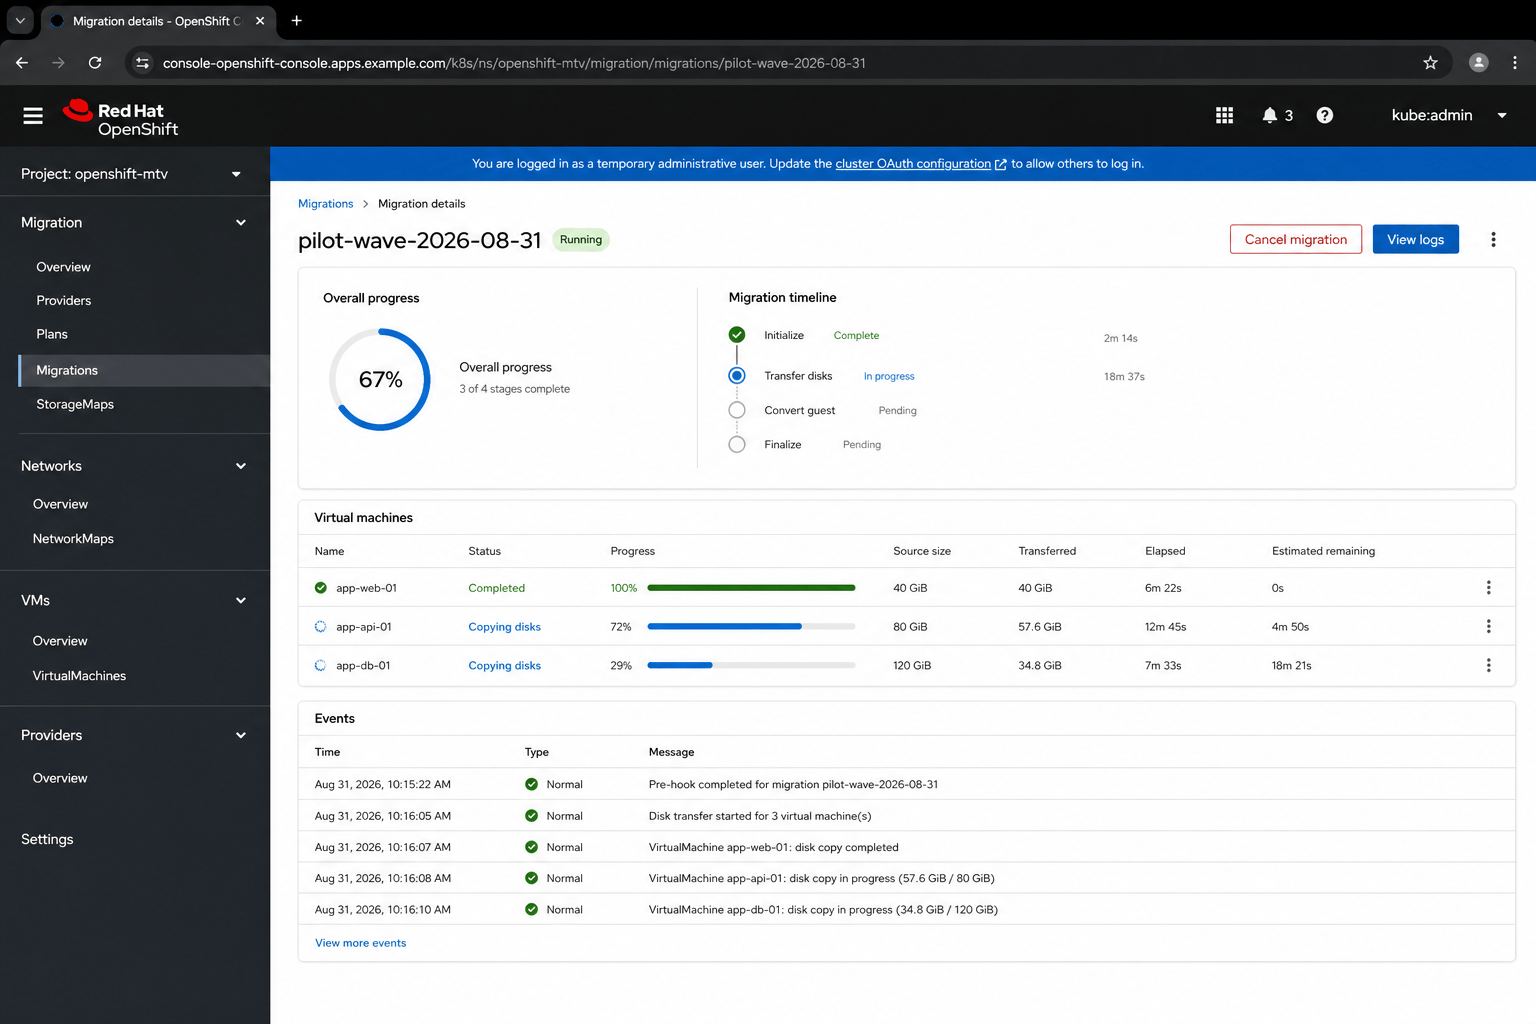
Before cutover, confirm guest drivers, disk formats, boot mode, MAC-address requirements, static addressing, application dependencies, backup coverage, maintenance windows and owner approval.
Start with a non-critical VM that represents the same operating system, storage and networking patterns as production. Record the migration time, application checks and rollback steps before scheduling a larger wave.
13. Production acceptance checklist
Use this as a handover checklist. Each item should have evidence such as command output, a monitoring screenshot, a test record or an approved runbook—not only a verbal confirmation.
- All required nodes are
Readyand MachineConfigPools are updated. - ClusterOperators are available without unresolved degradation.
- DNS, API, ingress, NTP and external registry access are stable.
- Enterprise identity, RBAC and administrative groups are configured.
- Temporary bootstrap credentials are removed after alternative access is verified.
- OpenShift Virtualization components are healthy.
- Hardware virtualization is available on every intended VM worker.
- Multipath and storage paths are verified on every applicable node.
- Storage failover, snapshots, expansion and restore have been tested.
- The internal image registry is managed, replicated and backed by a bound PVC.
- NMState policies are available and tested on a limited node group.
- VM network and storage mappings are documented.
- A pilot migration and rollback have succeeded.
- Monitoring, logging, backup, capacity alerts and upgrade procedures are operational.
- The final runbook contains no passwords, tokens, private keys or internal secrets.
Final guidance
The safest deployment sequence is to prove one layer before adding the next. Build a healthy OpenShift cluster first. Then validate virtualization, storage, the image registry and VM networking independently. Only after those layers have passed failure testing should you introduce migrated production workloads.
That staged approach makes troubleshooting easier, reduces the blast radius of mistakes and produces evidence that the platform is ready for real applications.
Official references
- Installing OpenShift with the Assisted Installer
- Customizing Assisted Installer with Operator bundles
- OpenShift bare-metal installation and multipath guidance
- OpenShift Virtualization post-installation networking
- Portworx Enterprise on bare-metal OpenShift
- Portworx supported Kubernetes and OpenShift versions


Leave a Comment
Your email address will not be published. Required fields are marked with *